Name: Brandy Ungles
Date: April 22, 2013
Lesson Name: Fossils and Art!
Materials used:
- Model magic (I used store bought, but here is a link for homemade)
- construction paper/ recycled paper
- Markers*
- Paint*
- Paint Brushes
- Tissue Paper*
- Modge Podge*
- Glue
- Dirt (I had to add some hot cocoa mix to my dirt as it was a little more rocky than fine like soil or dirt)
- Recycled* boxes
- Buttons*
- Ribbons*
- Feathers*
*indicates optional
Resources that helped inspire this:
- The Crayola Art and Science Lesson book. I did modify to fit with something I would like to do, but this was where the idea came from.
This lesson incorporates Art with
Science. I enjoyed creating this lesson because I think it is important to be able to integrate a standard school subject with something more creative. I plan to teach science when I am done with school, and rarely see art and science integrated, so I thought that this lesson would provide a fun challenge.
This lesson can be used with several ages or grade
levels depending on what modifications you make to this lesson, or
the accommodations you provide.
This lesson is a paleontology lesson about digging for fossils and imagining what the dinosaur will look like once you put together it's skeleton. For this demonstration we will be gearing towards a fifth grade class, with the students working in partners.
Step-by-step:
- Once students are in partners, hand them each a small amount of Model Magic clay in order to create bones for their partner to dig up. Make sure they have enough to construct a full dinosaur skeleton. *note- the student making the fossils, does not need to create a specific shape for the dinosaur.
-


Student molding class in to a skull and neck
- Once the student has made all of the bones, give them a box to represent a dig site. Fill this box with dirt, then let the student bury the bones they just made once the clay has had time to dry.

This is my dig site, I used a recycled box and glues construction paper to the outside which is totally optional.

Dig site box with bones buried and dirt (and hot cocoa on top) - Have the student exchange boxes with their partner. Now they get to dig for fossils! Use paintbrushes, old tooth brushes, plastic spoons etc.

Student using a brush to dig for fossils

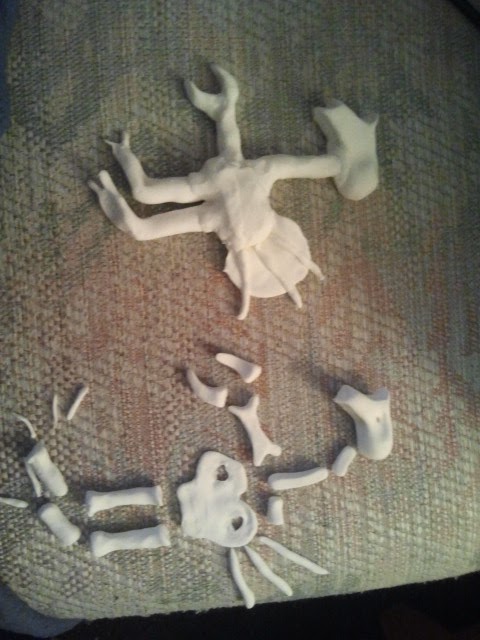
The students place their found bones in a small dish or on a piece of paper (I used some recycled food boats from Subway) - Have the students arrange their fossilized bones on a piece of construction paper in to whatever shape they think their dinosaur is. Glue the bones down when you are happy with the shape.

- After the students have created their dinosaurs skeleton, it is time to create a diorama showing what they think their dinosaur would have looked like in the prehistoric period.
- Students will need more Model Magic clay to create their dinosaur!

My completed dinosaur from the skeleton outline. 
This is what it looks like next to it's skeleton. - Next have your students decorate their dinosaur and the diorama that your dinosaur will be living in.

I used my big box of school supplies 
And old art supply box

Dinosaur being decoupaged with tissue paper

His house decorated with construction paper scraps

Toilet paper tube tree, and Halloween spider web moss

Dinosaur in enclosure

close-up

Don't for get to give your dinosaur a name, mine looked like a turkey.
- Finally, display the completed artwork with the fossils in your classroom, and enjoy!


Extra tips/ Problem-Solving:
-My Turkeosaur didn't stand on his own, which is why he is in the back of the box for support, so maybe use toothpicks or something else for more support.
-If you are doing this with younger kids pre-make the bones
-Another adaptation could be drawing the dinosaur instead of creating a display.
-Have the students bring items from home if they wish, but also provide many mediums for their use.
-Most importantly though: Cats love art projects, and dinosaurs. Keep them away! =)
 |
Art Vocabulary:
- This project used the art ideas of:
- Form- When you create the 3-d skeleton as well as the actual dinosaur you are using form.
- Texture- Is also used when decorating the box or the dinosaur.
- Perspective- Is used when placing the dinosaur in the habitat and decorating the box.
- Balance- Is important when actually creating your dinosaur in order to make sure they are symmetrical and able to stand.
I hope you enjoyed this lesson! Respond
in the comments below with your suggestions or if you have any
questions. =)
No comments:
Post a Comment